If you would like to learn how to start a travel blog of your own, this in-depth guide will give you the tools to do that. We have been running a successful travel blog for the past 11 years, and it is how we make a high 6-figure income annually.
When we started our own blog in 2008, we didn’t know where the industry was heading. We flew by the seat of our pants, hoping that one day we’d earn an income that would be able to sustain us full time. Luckily, we figured it out.
And now we can share what we have learned over the past decade so you too can start your travel blog on the right foot.
It might seem daunting at first, but don’t worry, if you follow these steps that we have outlined below, you will be on your way to starting your own travel blog and possibly a new way of life.
11 Easy Steps – How to Start a Travel Blog
First…A Reality Check
When we started travel blogging back in 2008, it was a lot more difficult than it is today.
It involved a lot of hand-coding changes, and the themes were pretty primitive. Truthfully travel blogs just looked awful compared to today’s websites. Nowadays you can be up and running in one day if you want to. It’s a far cry from the early days when we really had no idea how to start our first travel blog.
What you have to remember is that if you want to make this a career, it’s a lot of hard work, time, and perseverance. You have to think long term. After all, there are a lot of travel blogs out there, so you need to do what you can to make yours stand out such that readers will consider your work a true resource.
It is not just heading out to travel the world and being able to write about travel. It involves working on different social media platforms like Facebook and Instagram, networking at conferences, optimizing for search engines, etc.
You can’t just throw the travel blog on autopilot after you start it and expect it to be successful.
The Crucial First Step to Starting Your Blog
Get a reliable hosting platform!
The first step toward starting a travel blog on the right foot will be one of the key things that will help you to become a successful travel blogger.
That means you have to have a reliable host. If you are just starting out then we recommend Bluehost. It is what we started with and is the most economical and reliable choice.
GET YOUR HOSTING AND DOMAIN NAME FOR 50% OFF FROM BLUEHOST RIGHT NOW
Do I have to spend money?
You are also going to have to spend a little money. Remember; Investing in yourself is the first step to travel blog success. We learned early on that if you want your travel blog to be a business you have to be willing to put money back into it. More on that later.
If you are just looking to do this as a hobby, and there is nothing wrong with that, then I suggest starting a wordpress.com account.
It is free and gives you the tools to update friends and family. But if you are more serious and looking to do this full-time, then continue reading. Either way, you need to make that decision, as competing with the best travel blogs in an effort to generate revenue is not something that’s going to happen by accident.
Step 1: Picking a Name
This is so important. We actually regret naming our travel blog The Planet D. We were going for a “Lonely Planet” type thing, and since our names start with a D we thought it was a good idea.

We were lucky; we could have bombed because our name doesn’t explain anything that we are about, but for some reason, we had success in spite of our name. Try to think of something that really shows off what your blog is all about.
Make sure your blog name is going to resonate years from now.
Travel Blog Names to Avoid
In our opinion it is better to avoid words in your blog name that restrict you to a particular type of travel, are really overused, or already used successfully.
A big part of having a successful travel blog is to make sure you stand out from everyone else, and your name is an excellent place to start. I am not saying that you can’t make a go of it with one of these I just think that after being in the business so long these seem to be the words that get oversaturated or overused.
For example, don’t pigeonhole yourself into the budget or backpacking niche if you think you will want to be doing more luxury travel in the future. And don’t use words that other travel bloggers have already branded successfully. Personal travel blogs are fun to read and you do need to present yourself to the reader (more on that below), but if you want your travel blog to be seen as that resource for readers, you need to make that clear with the name.
I would avoid names that include these words.
- Backpacking
- Budget
- Nomad
- Wander
- Vagabond
- Global
- Adventurous
- Luxury
Avoid Hyphens or Underscores
There is nothing worse when someone asks you what your blog address is and you have to say “blah dash blah dot com” they will instantly forget it. Not good when it is your livelihood. The key is to keep it simple yet effective.
It should describe your blog
Your blog name should be short and simple and tell the reader what you are all about in just that one phrase. I have noticed that a lot of travel bloggers who started early didn’t really think about this (Yours truly included). But some really stood out and chose their names wisely.
What comes to mind when you think of Expert Vagabond or Our Awesome Planet? It’s precisely what they want you to think. So get creative but keep it relevant to what you will be writing about.
Pick A Name that has Longevity
Trust me when I say you don’t want to be changing your name down the road. You don’t want to figure out how to start a travel blog more than once, as all the work you put into the first name may go to waste.
It is a massive pain in the ass. I know a few people who changed niches or found their names didn’t relate to the way they traveled anymore and had to change it. The technical side can be complicated, and you would have to start your social channels all over again. So make sure that once you choose a name, it is one you are going to stick with down the road.
Picking a name is not easy, and I think it is one step that most people don’t spend enough time on. It is the first representation of your travel blog brand and what you are about so make sure you take your time, bounce ideas off of friends and family, or even check out some Facebook Groups which can be very helpful in being brutally honest.
Step 2: Where are you going to host your blog?
This is the point where most people start to freak out. When thinking about how to start a travel blog, most people don’t delve too deeply into the “techie” aspects of it until they actually encounter it. Now is when you start wading into the technical side of things here, and it can be scary.
If you are technically challenged, like me, then all this mumbo jumbo about hosting can be a turn-off. Well, I have good news for you, it is really not that scary.
What is a Host?
Someone once explained it to me which was quite helpful. A host is a place that stores all of your travel blog content. It is like your little slice of the internet, and everyone who has a website has to have one. The difference between hosting companies is just ease of use and how much traffic they can handle.
When you are just starting, we recommend Bluehost. It is what we started on, and it is affordable.
We have actually secured a Special Price for The Planet D Readers, only $2.95/mth!
Plus the cost of your domain name is FREE.
Later on down the road when your website is getting crazy traffic, you can easily move to something more suited for that but realize that it is going to cost more money. We pay about $1000/yr for our hosting now!
How to Start a Travel Blog – what to do First with Hosting
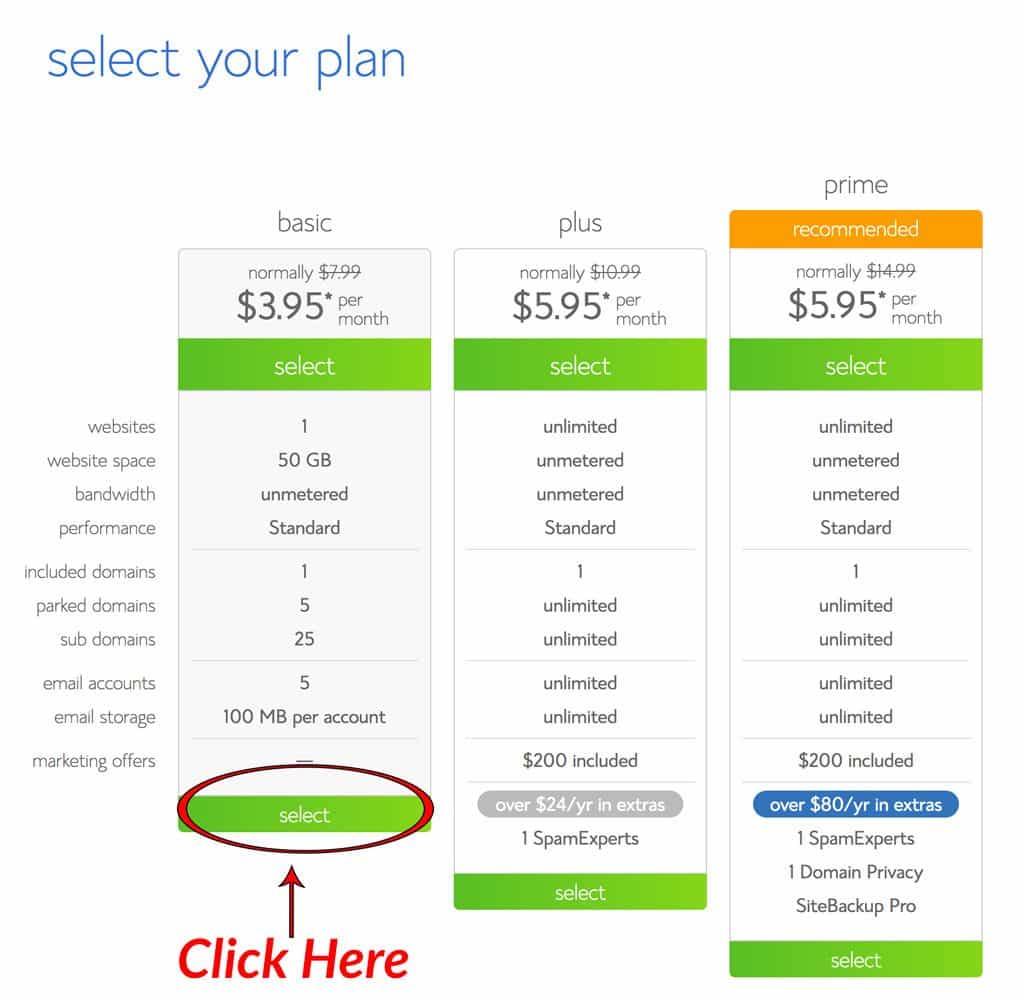
First head on over to Bluehost.com and click on the get started now button. Then get ready to choose your plan.

Choose your plan:
Another great benefit of Bluehost is that you can upgrade your plan as you go so we recommend starting with the basic package and then moving up from there as you grow.
Register your domain name.
Now it is time to register your travel blog name/domain name. You probably want a .com address as these are the most recognizable and trusted. If you already have registered your domain somewhere else, you can transfer it as well. It is good to have everything in one place.
Remember this is free with Bluehost.
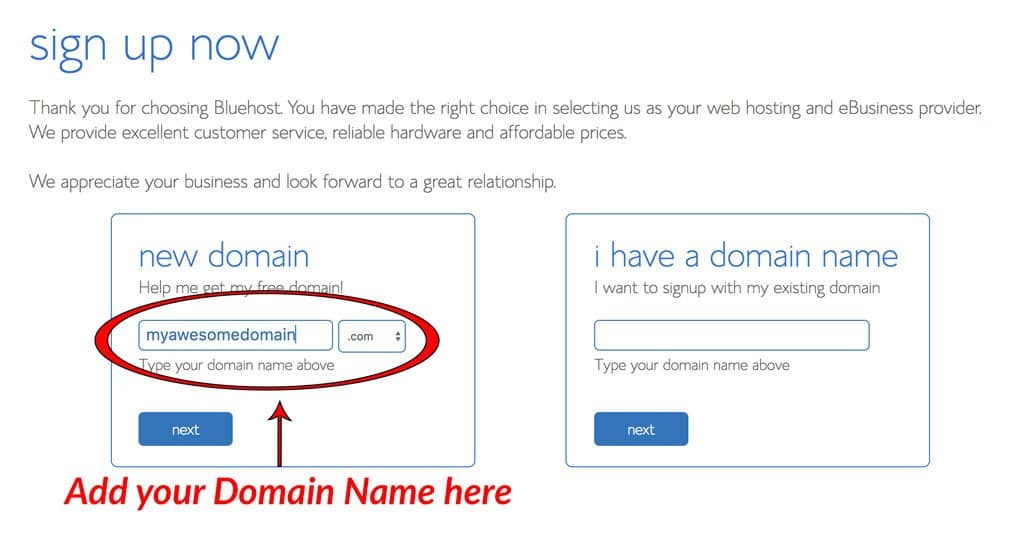
Type in your name to see if it is available. (If it isn’t you will have to go back to step one and brainstorm some more ideas.) If it is, click next and move to the final step. You are almost there.
Package information
It is getting serious now. It is time to choose how long you are going to register for. We recommend one year at a time.
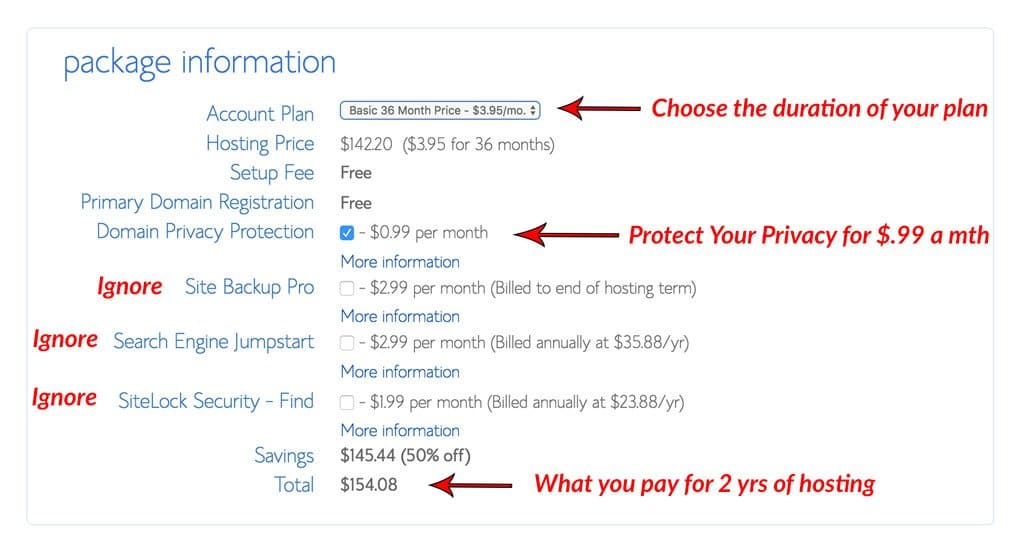
When choosing your package information, I would ignore most of the options because you don’t need them. But we do recommend Domain Privacy Protection. This protects your identity so people can’t look up who owns your site and personal information like address phone number etc. It is cheap for a little piece of mind.
Boom! You are done! You have just purchased your hosting and domain name. Easy right? Time to move on to the next step where we get WordPress all set up, and you can start creating content!
Step 3: Installing and Setting up WordPress
Now that you have website hosting and your domain name, you need a place to house your travel blog content. This is called a Content Management System or blogging platform.
WordPress is by far the most popular Content Management System out there, and it is free. It’s also the easiest to use.
You may have heard of Blogger, Blogspot, or Wix, but we do not recommend using these systems. If you choose a Blogger or Blogspot account, you will end up having a URL like this: theplanetd.blogspot.com. You don’t want that; you want theplanetd.com. I know tons of travel bloggers and bloggers in general who used one of these in the beginning and switching over to WordPress was a nightmare.
If you want to know the differences, then check out this very informative post by WPBeginner.com. It really gives you some great tips. WordPress is the best; it is used by most bloggers and large brands. We use it and feel it is the best. It has a proven track record, it’s been around for years, and it offers a lot of freedom to take control of your blog.
Installing WordPress with your Bluehost account is a snap.
How to Set up your Travel Blog on WordPress
Head on over to your Cpanel and scroll to the “Website Builder” section then click on the “Install WordPress” button. When it asks where you want to install it, be sure to choose the domain name you just registered – (http://myawesomedomainname.com)
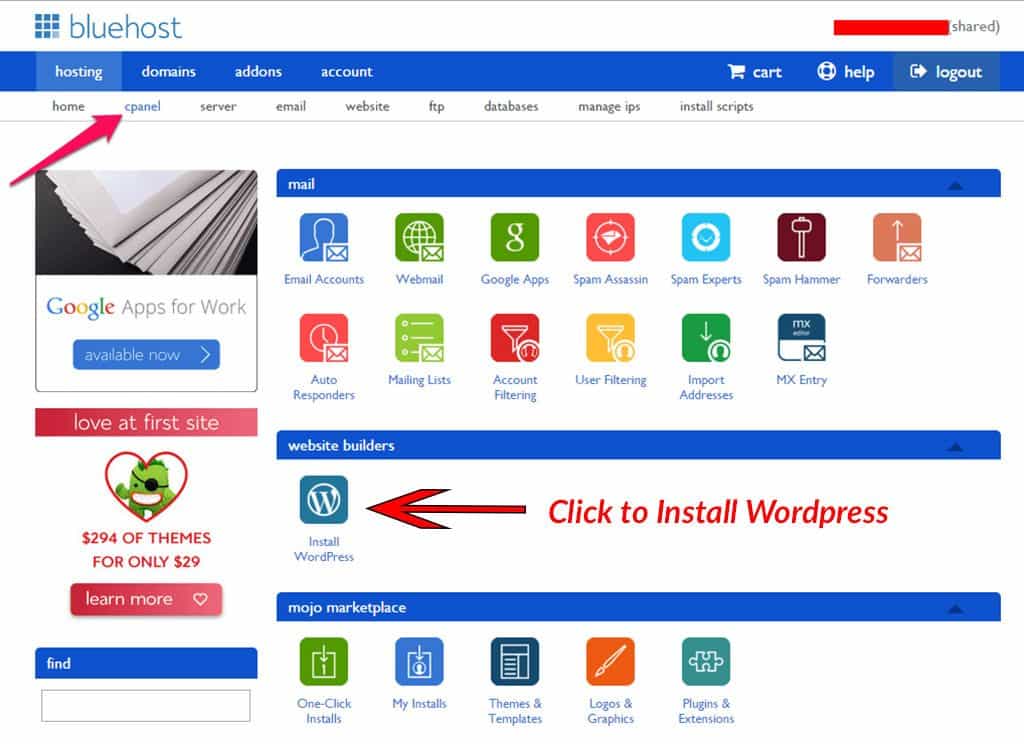
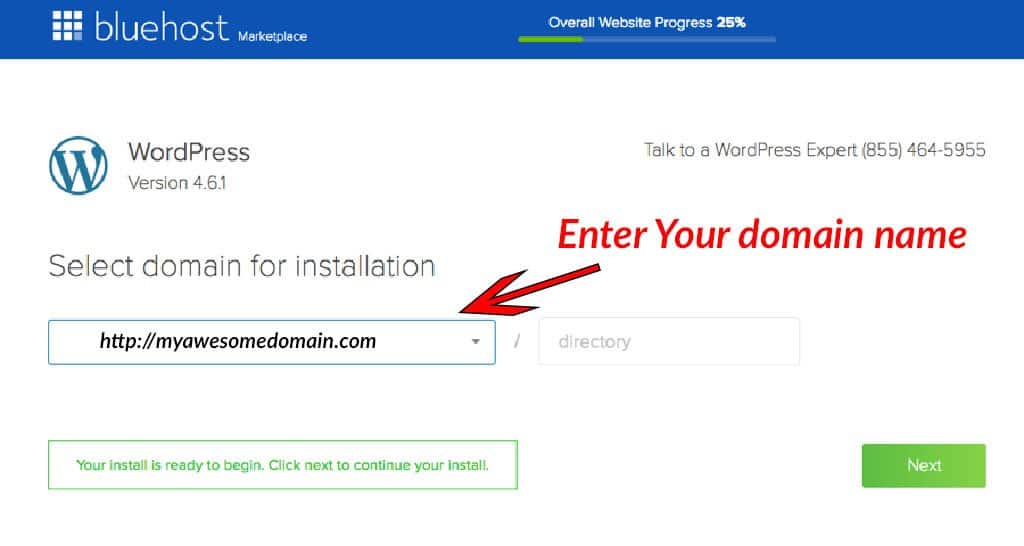
Once it is finished installing you will be able to login to your new blog via the WordPress dashboard at http://mydomainname.com/wp-admin/. Just punch in your username and password, and you are ready to go.
Congrats! That does it! You are done with the technical end of things, and now it is time to get creative and get your new travel blog ready for the world to see.
Step 4: Choosing a Theme
You are now at the point where you have to make some creative decisions. Learning how to start a travel blog starts to get really fun at this point.
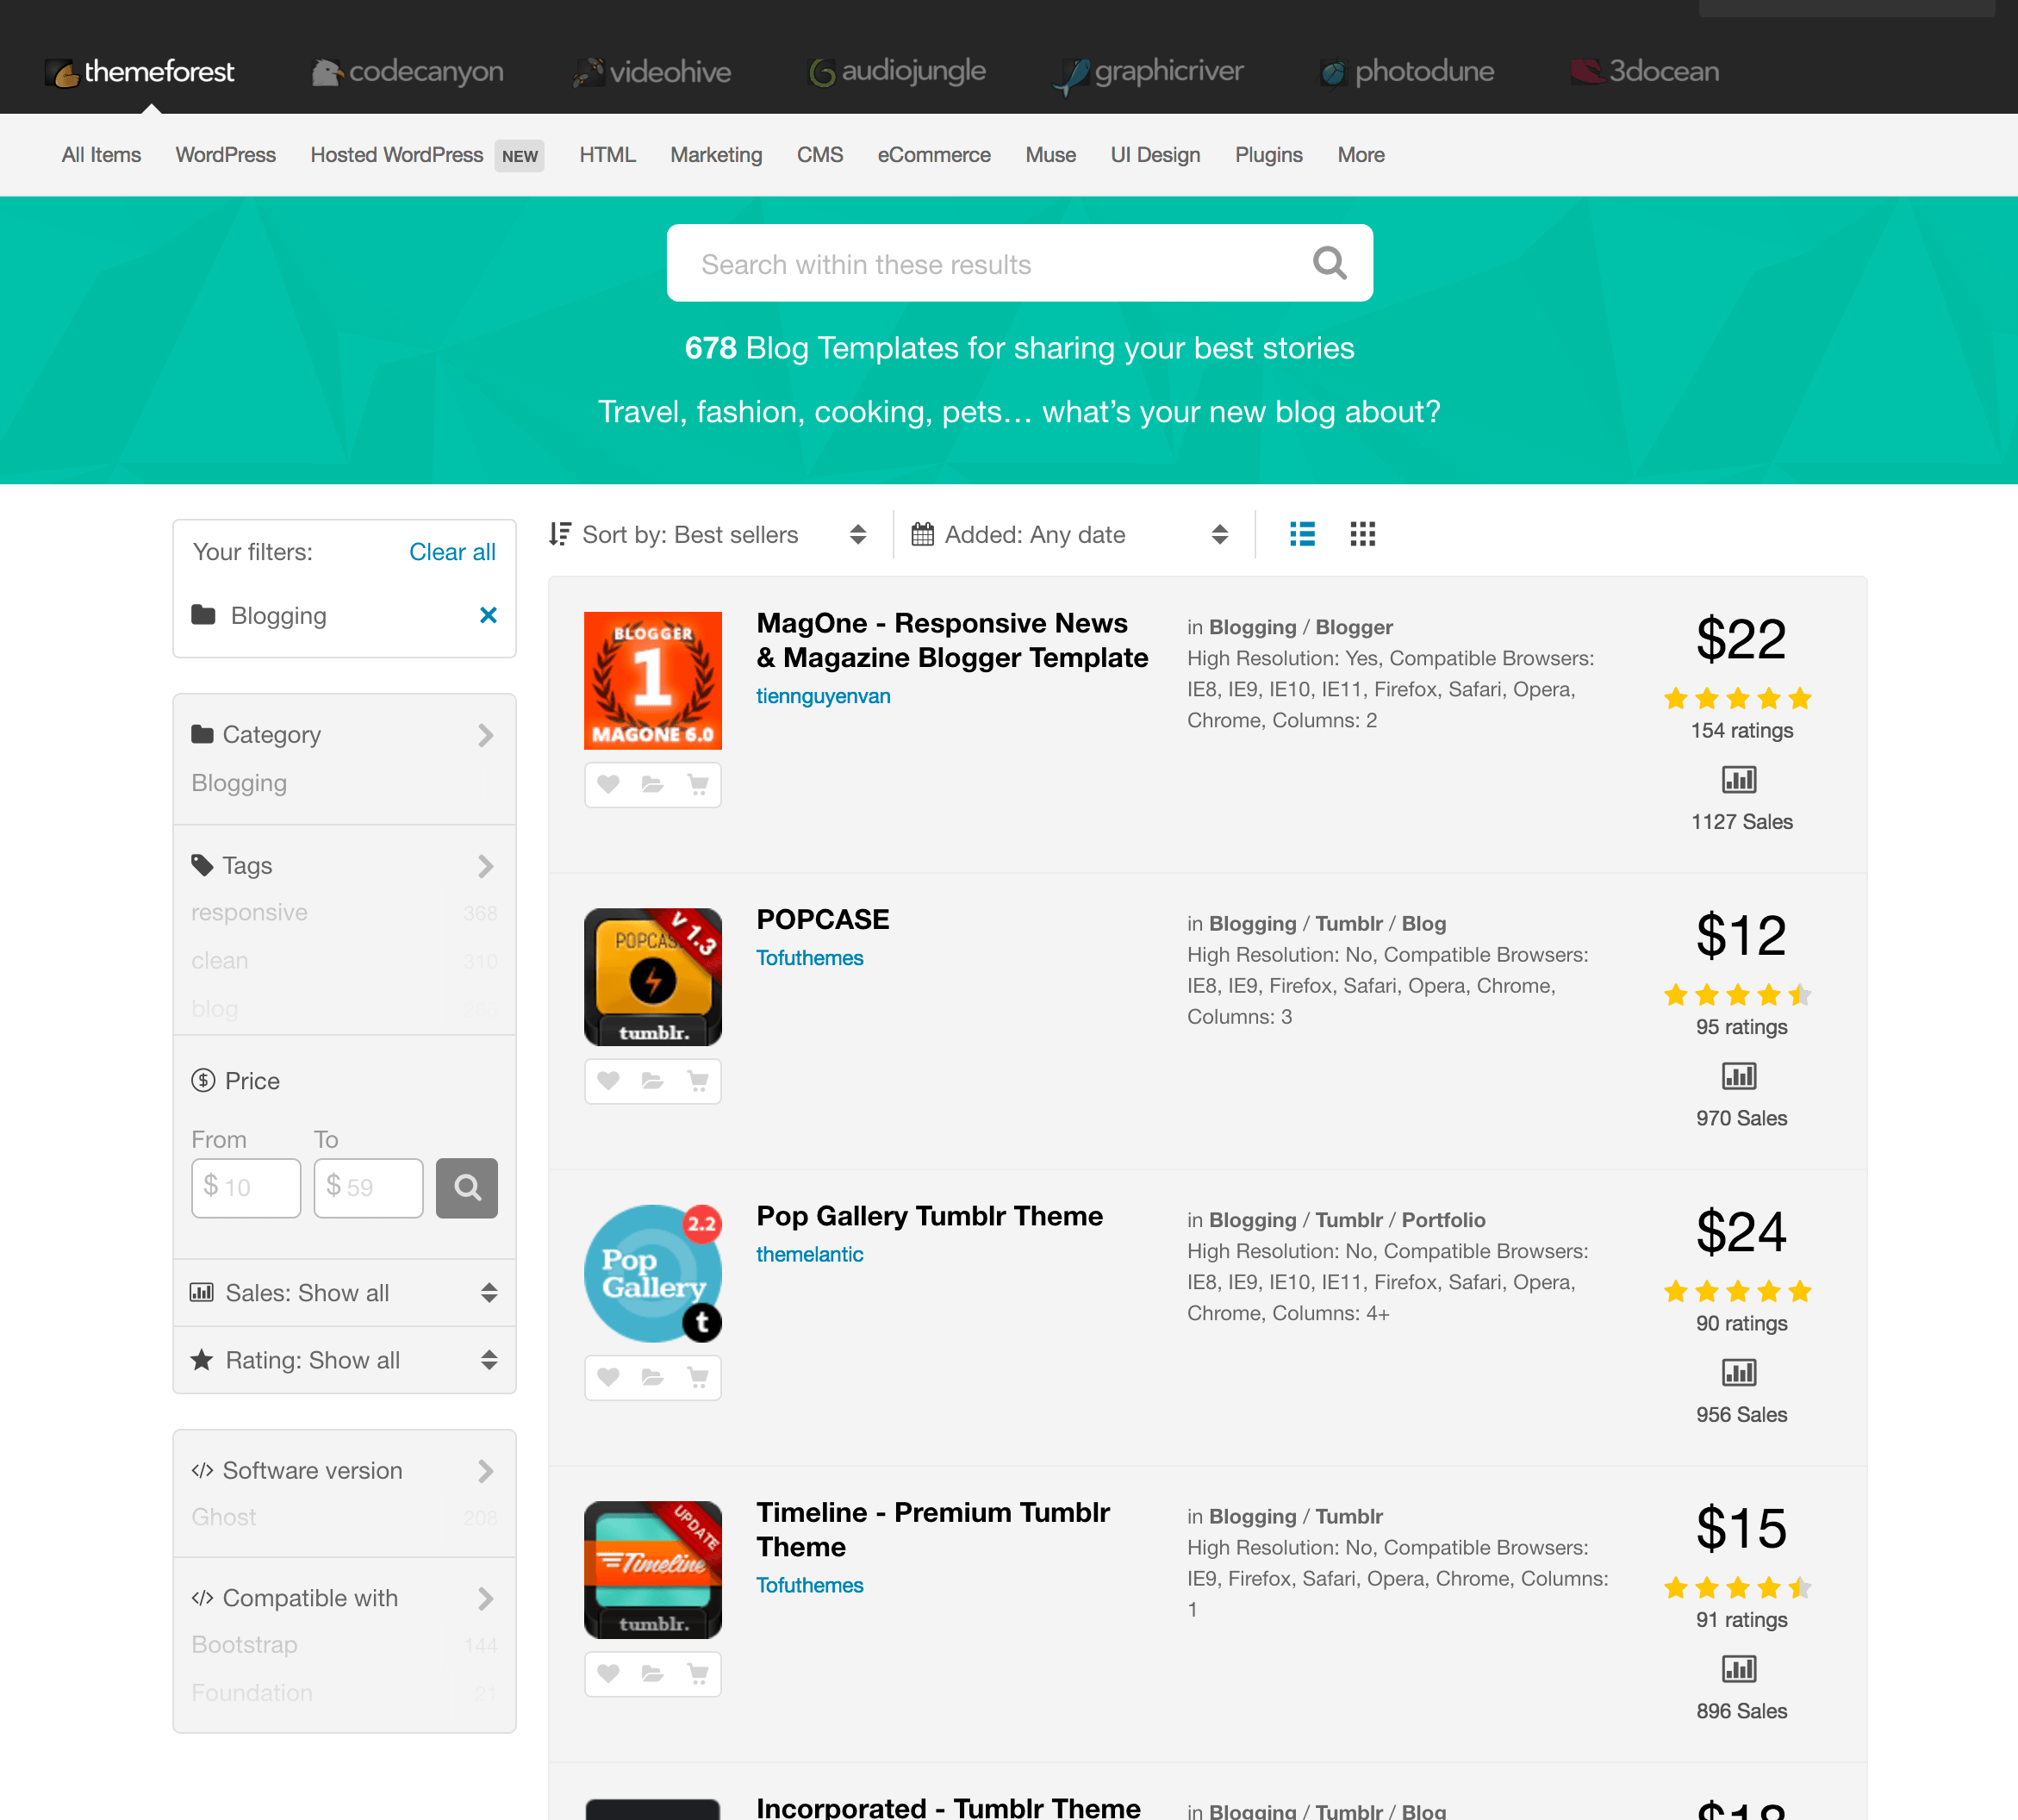
WordPress comes with some pretty lame themes to get you started, but luckily there are a ton of themes to choose from to help you make your blog look the way you want it to. I would recommend you spend a little money here on a premium theme.
We made the mistake of when we first started just looking at the free themes. But by investing a little money when setting up your travel blog, you can get ones that are more customizable and come with support.
I find having support for a particular theme extremely valuable, especially when you are just starting, and worth the extra $100 you spend on a theme. You can check out Woo Themes or ThemeForest for some cool designs.
*Note* Take your time here. Changing themes often can really play havoc on your nerves. It is ok to update now and then but you don’t want to be doing it often as each theme handles things a little differently.
We have a custom theme but have used a few different ones in the past. If you have an idea of exactly how you want things to look you can hire a custom coder and designer to do that for you. I suggest checking out Upwork or Freelancer.com but be prepared to fork out some cash. It is not cheap.
Are you feeling Intimidated? Check out some WordPress Training to help get you started.
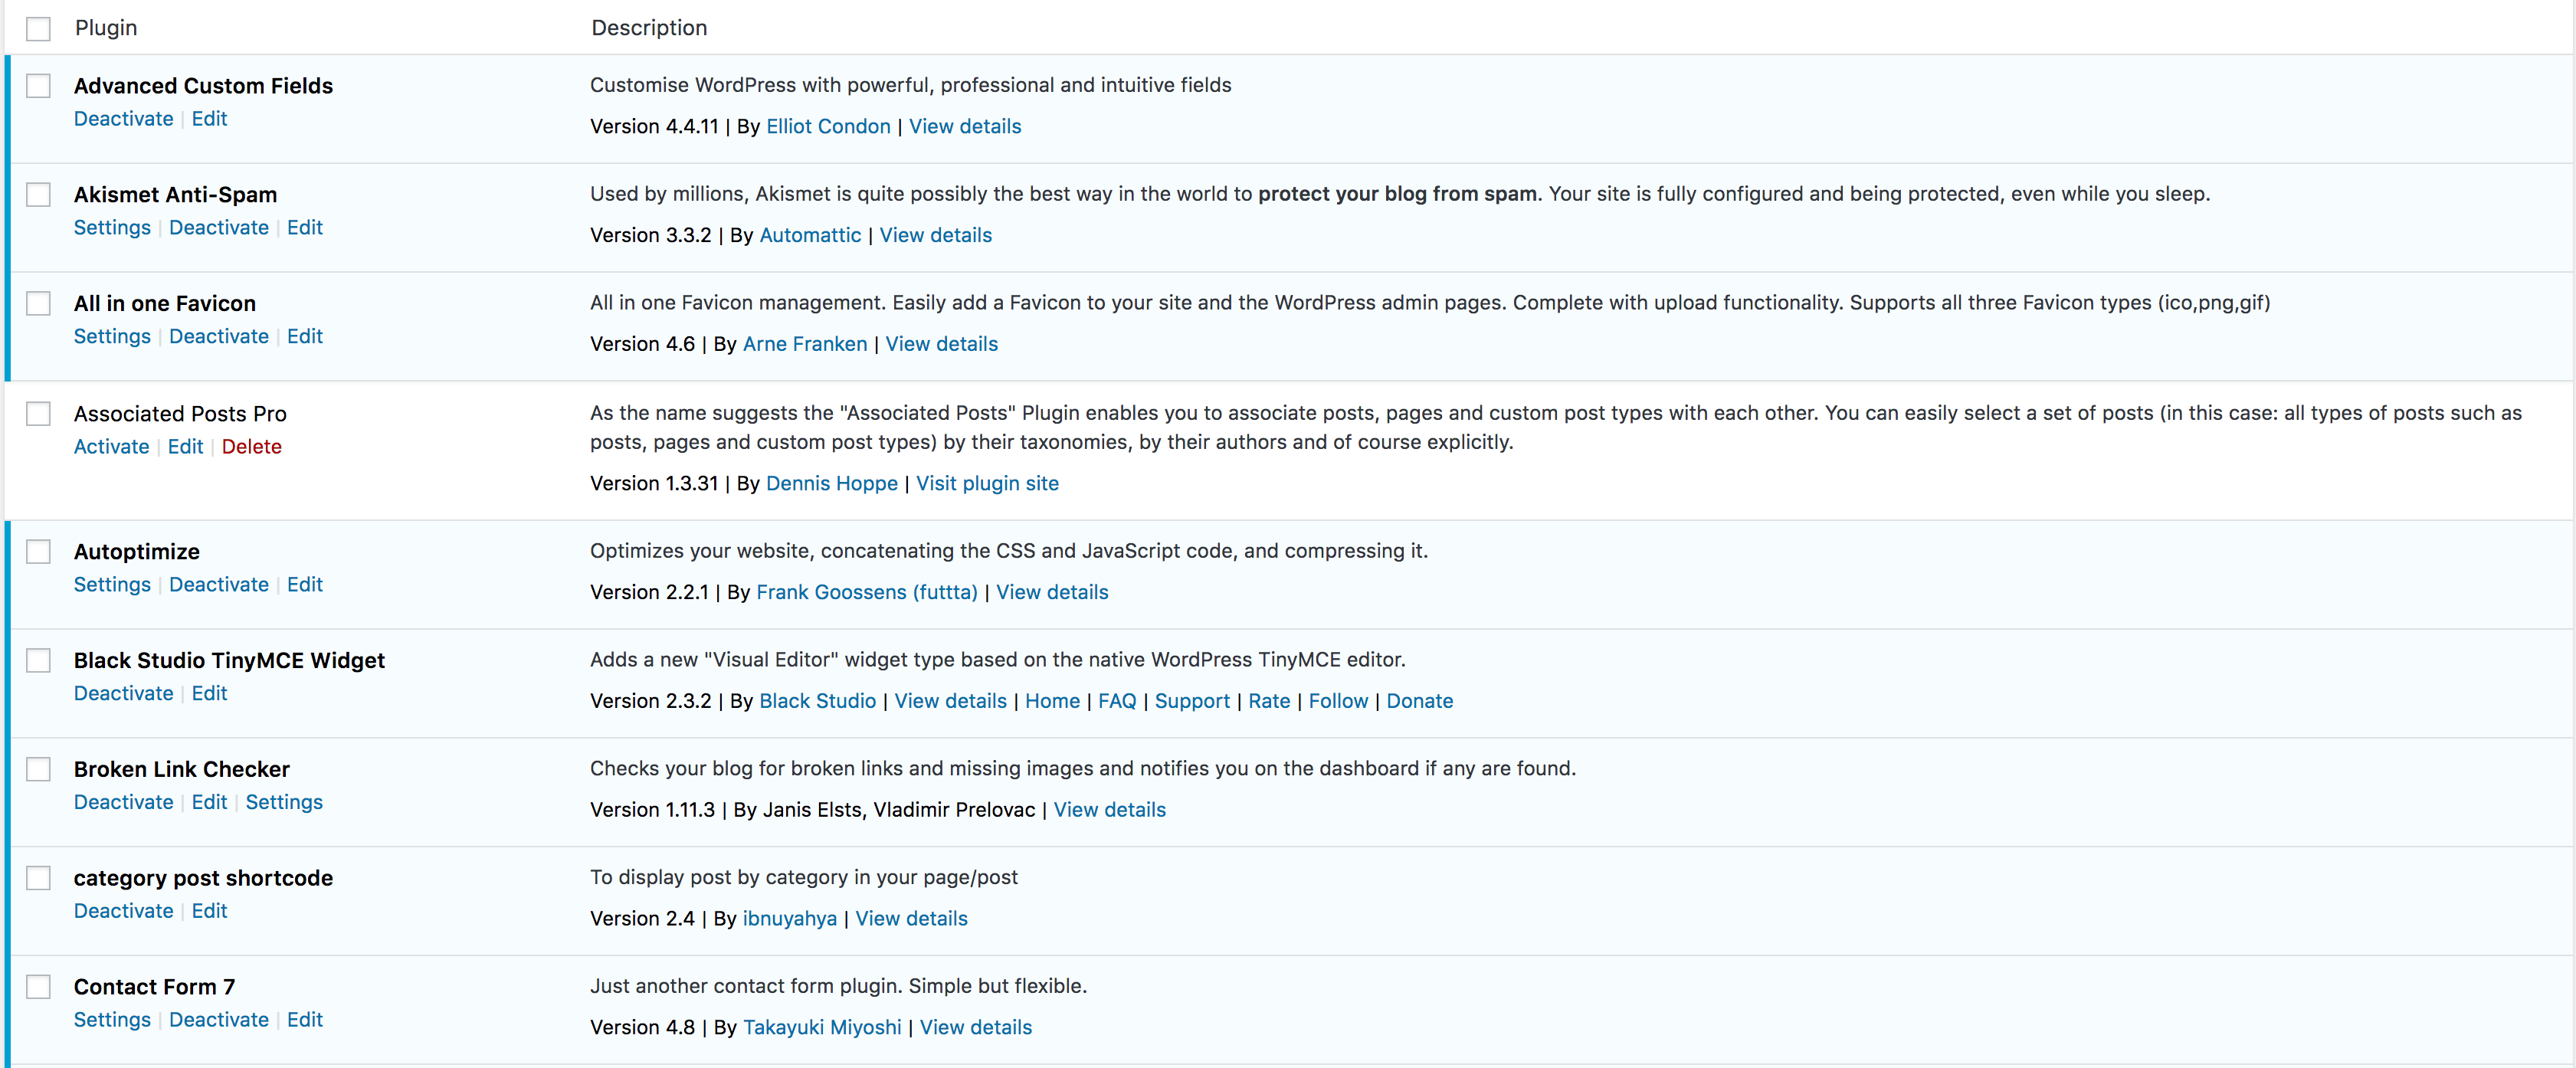
Step 5: Install Essential Plugins
We struggled with this when we first started, and we have seen a lot of them come and go, but there are a few that we feel are essential when figuring out how to start a travel blog. You’ll also need to stay on top of new plugins to take advantage of a few that may be useful to you.
What is a Plugin?
Plugins are like little add-ons that help your site without having to jump into coding. So if you are not a coding wizard, then plugins were made for you. A word of warning though; more plugins does not always make things better.
If you overload your site with them, it can impede speed and functionality as well as increase the risk of conflicts (some plugins don’t play well with each other.) So my recommendation is to start with these plugins to get going and then build from there. A good rule of thumb is not to have more than 20 running on your site. But as always less is more.
Recommended Plugins:
- Akismet: An Anti-Spam Filter
- Yoast SEO: For all of your SEO needs
- Social Pug: For your Social Media Buttons
- WP-Rocket: This will help your site run faster
- Short Pixel Image Optimizer This will optimize your images.
- Contact Form
Step 6: Make the Most Important Pages First.
One of the main questions we get when we get asked how to start a travel blog is what pages should I make first.
Well obviously the Home Page is quite important, but your theme will probably define that. In my opinion, the most important page on your travel blog is your about page.
This is your chance to tell people what you are all about and tell them why they should follow you and keep coming back. The central part of personal travel blogs is “You,” and this is your chance to tell your story. It is where you can connect with the reader in the long-form and make a lifetime fan out of them.

What is in a good About Page?
I like to think it is broken down like this:
- Start by telling them how you are going to help them, eg. Provide valuable travel advice, inspire them, etc.
- Jump into your story. Tell them why you are publishing this travel blog and what motivated you. Something inspirational.
- Tell them about your specialty. What sets you apart from everyone else? Describe your niche.
- The final section should be about proof. Why are you an expert? Why should they listen to you? Have you won any awards that relate to your niche? What are your skills?
If you follow these four steps, you will be on your way to creating a kick-ass About page. After you have got that finished, I would move on to making a Contact Us page and then start writing that content.
Step 7: Setting up Your Social Channels

Social media is such a huge part of promoting and marketing your website that you have to be active. So make sure you grab your channels as soon as you can and try and keep all of your social channels the same name. Also, I know it can seem overwhelming at first but try and develop a strategy for each one. It just makes it easier to say, “You can find me @blogname on all our social channels.”
What Social Media Channels should I be on?
Step 8: Connect Your Blog to Google Analytics
Google Analytics is imperative if you are looking to make this into a business further down the road. The question of how to start a travel blog that generates revenue always revolves around data and managing that data.
Google Analytics is the best way to track your traffic and gives you great insight into your readers. You will be able to see everything from their age, where they come from, how long they spend on your site, and the pages they explore.
You can find out all you need to know about setting this up on the Google Analytics website. But, if you are looking for an easier way to get things set up I would recommend checking out the Monster Insights Google Analytics Plugin. It basically does all the heavy lifting for you so you don’t have to touch any code.
Step 9: Set up a Newsletter
Most people never talk about this but almost every successful blogger that I know wishes they had started their email list sooner.
Why is a Newsletter Important?
A newsletter lets you communicate directly with your reader. You go right into their inbox, and they choose to have you do this through the sign-up form. To have people that have chosen to read you each week or month is probably the most engaged of an audience you can have.
Plus, down the road, if you move into working with affiliates or developing a product, then this is the place you go first. This is why it is so important to start building early. Even if your first newsletters are just updates from the travel blog posts that you release weekly, it will start building trust with your readers and a relationship.
I also suggest investing in an email client that can grow with you. We have changed clients a few times, and it is a real pain in the ass. You have to get people to reconfirm their addresses, and you will probably lose some people by doing this. You don’t want that to happen.
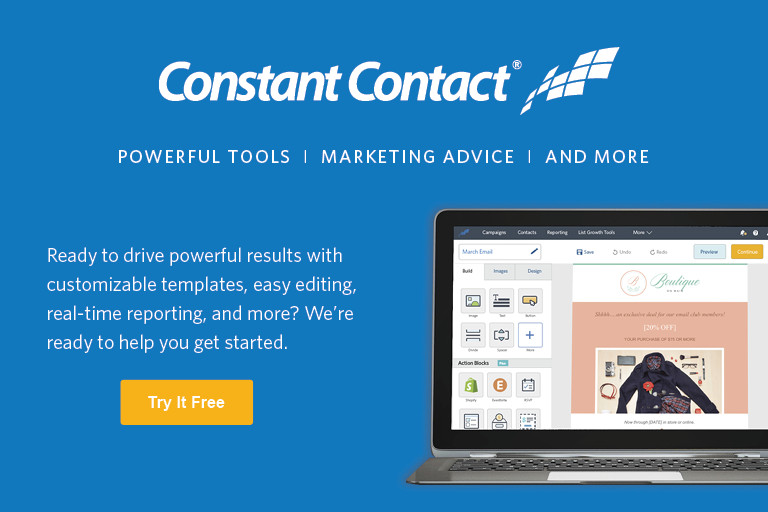
I suggest Constant Contact to start out with.
They offer a 60 Day Free Trial so you can see if it works for you.
It may be a little more than you want to spend at the beginning, but in the end, it is worth the investment. They have templates you can use and are quite easy to set up and automate.

How Much is This Going to Cost Me?
Most people think that you have to have a ton of money when considering the question of how to start a travel blog. The truth is it can cost very little. When we first started, we drew on our experiences in places we had already been, so it even kept our travel expenses down. We have put together what you should set aside for the first year of travel blogging.
Now this will differ slightly for everyone depending on whether you have extra money that you want to put into Facebook Advertising or if your traffic grows immensely and you have to upgrade your hosting plan but for most this is what it will be:
- Hosting $3.95/mth X 12= $47.40
- Theme $100
- Email Hosting: $20/mth X 12= $240
Total Cost for 1 Year of Travel Blogging: $387.40 or $32/mth (6 Grande Lattes/mth at Starbucks)
Step 10: Getting Support
It can be a lonely, frustrating road on the way to travel blogging fame but luckily there are a ton of ways you can get some support and advice. There were certainly no support groups when we were starting out and I wish there were. They are not a requirement to figure out how to start a travel blog but if you are serious about it then it is worth the investment.
We are part of both communities and I still learn things in the Facebook Groups and Forums it is a great place to get support from people who are just starting out as well as seasoned veterans. For Travel Photography we recommend taking Photographing the World by Elia Locardi. We feel it is the best travel photography course out there. Read my review here.
Step 11: Start Making Money with your Travel Blog
I bet you never thought I would be talking about making money in a post about how to start a travel blog but it is possible.
As I mentioned about the newsletter, starting early is a perfect way to begin making an income from your blog. I know a lot of people say to wait until you build up large traffic to make money, but I disagree. The easiest way is to start making some cash is with affiliates.

Affiliates
Now I could go into a ton of detail about what affiliate marketing is and how you can do it but I found the Make Money from Affiliate Marketing course from Michelle of Makingsenseofcents.com does a way better job.
Michelle makes over $100k/mth from her blog and most of it is from affiliate marketing. She guides you from the very beginning, helping you put into place good practices so as your traffic increases so does your income.
Make Money with Affiliates Now!
This is probably one of the best courses I have ever taken when it comes to learning how to make money from your travel blog. It is worth every penny if you want to learn about monetizing through affiliates. But you can always go it on your own as well by signing up for affiliate programs like Amazon and Booking.com so that you can monetize through both products and accommodation and then if it is something that you are interested in getting more involved as you grow.
One note about promoting companies: It is much easier to sell a product or service you believe in than just being a shill for a product you have never tried. Success in making money with travel blogging is about honesty and integrity. We go by the motto: If we haven’t used it, we don’t promote it.
Common Questions about Starting a Travel Blog
When you first start out you can try out this method. As you get more established you can sell digital products, advertising, or partner with tourism boards to name a few.
It is pretty cheap to start a blog. Costs can vary from $200-$300/year. Check out the full breakdown here.
Time to get to Work
Well, that should do it. We have covered all of the steps that you need to take to start a travel blog. By following these steps, you should be on the road to becoming a successful travel blogger in no time.
But remember, travel blogging is hard work. We probably put in more hours than most CEOs, but we love every minute of it.
One of the most wonderful things about coming up with travel blog names, formulating travel blog ideas, and starting a travel blog, in general, is that you get to do something you truly love to do. There’s no substitute for putting your professional effort into something you’re truly passionate about, as that doesn’t even feel like work most of the time.
If you are willing to put in the work and can offer something to your readers, you will no doubt have success in this business.
Good luck and if you have any questions, please leave a comment below and we will do our best to help you out.
Learn More About Travel Blogging and How to Start a Travel Blog with these Resources!
Disclosure: There are some affiliate links in the post above, but these are all products we highly recommend. We won’t put anything on this page that we haven’t verified and/or personally used.


